Friday, December 12, 2008

Pot Holder Tutorial

Due to overwhelming response (one request), I will post the instructions for the pot holders. I love to teach!


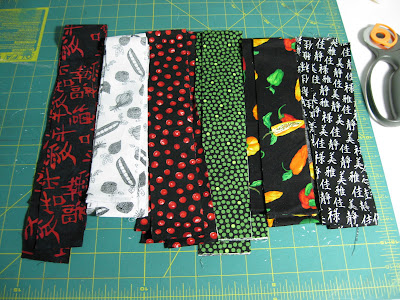
Begin by cutting strips 2 inches wide by at least 18 inches long.

I have multiples of each color here because I'm making multiple pot holders.


Sew your strips together with a quarter-inch seam and press the seams all in one direction. Trim the top and bottom edges even after sewing.


Trim your strips so that you have one piece that measures 9 1/2 inches by 10 inches, and one piece that measures 9 1/2 inches by 7 inches.


To the 9 1/2 by 7 inch piece, attach a 2 inch strip at the top and bottom. Press the seams toward the 2 inch strip.


You should now have two blocks measuring 9 1/2 inches by 10 inches. In the picture above, the back, and the front.


Now cut three layers of batting at the same measurement as your blocks. I use Hobbes Heirloom, and I have so many scraps that this project is an ideal way to use them up.
If you're smart, you will also include two layers of heat-resistant fabric which is pretty easy to find in the States, but I didn't even try to locate any in Singapore.


Pin and baste stitch all three layers of the batting to one of your blocks.


Your basting should be at a scant 1/8th inch so that it wont show through when the final 1/4 inch seam is sewn.


For the next step, you will need 5 inches of double-fold bias binding tape in a coordinating color. Make a loop and sew diagonally across the edge of the tape at a corner of your basted block, sewing back and forth several times to make a strong connection.


Pin the other pieced block right sides together to the basted block and stitch at 1/4 inch, leaving an opening for turning at the bottom of the block. Need I say it? You should always lock your stitches at the beginning and ending of every seam, and that is particularly important when you have a project that you have to turn to right side.
And one more thing:
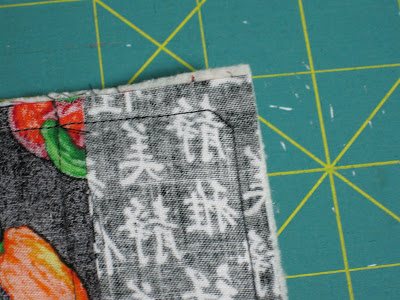
Sew diagonally across the corners for 3 or 4 stitches to make the corners really nice when you turn them.

Now clip the corners and turn the pot holder right side out. Press.


Carefully fold under the open seam at the bottom and pin.


Stitch across the opening at a scant 1/8th inch. Press. Quilt as desired. I stitched in the ditch on the front.


Finished pot holder:front


Finished pot holder: back


I hope these instructions are clear and I didn't leave out any vital information, like how much flour to add to the cookie dough recipe. Please let me know if you make any pot holders from this pattern and how the instructions worked for you! Good luck!

Thursday, December 11, 2008

The Never Ending Cooking Saga


When I say never ending, what I really mean is that this cookie recipe makes 8 dozen cookies! That's 96 stinking cookies! Man oh man!

But I am pleased with how they turned out. They taste good, too. Or so my family avers.

At the last dozen, I ran out of frosting. So I used the next best thing (my husband would say the frosting is the next best thing!)
Nutella! 
Not quite as elegant, maybe, but they taste nice.


That's a lotta cookies for a family of 3! I will be gifting some of these, I think.

Wednesday, December 10, 2008

Further Adventures

Today I realized I needed some gifts for the people who provide services for my daughter: her piano teacher, her drama coach, and the people who allow her to ride along with them to school every day. My sister had sent me a picture of some lovely patchwork pot holders, and it was these that provided the inspiration.


Front


Back


The first pair


I will be making at least 3 pairs of these. Tutorial, anyone?

And here's the results for yesterday's cookie fiasco:


I baked up a dozen, and we tasted them before we frosted them. Not very cinnamon-y, but my husband thought they kinda tasted like snickerdoodles. I was hoping for something that would taste and smell very cinnamon-y, especially while baking. But oh well. They tasted fine.

I went ahead and made some powdered sugar frosting, but my green food coloring (purchased in Singapore, of course) is rather lime green colored. I wanted a nice pine color, but I wound up with a not very nice olive color. Oh well, again.


I made a dozen, there's only 7 here, and at the time of posting, they are all gone. I decided to finish batch tomorrow. I will frost them white and put silver decors on them. That will be much more elegant.

File this under Good Ideas:


Recently, I decided it was too much of a hassle to take down this large tub of flour off a shelf over my head whenever I needed a small amount for this or that. So, I started looking around for a container that could hold a small amount of flour, and be more convenient.

I was about to dispose of this jar after transferring the Equal out of it to another container I like to keep it in, when I noticed the suitability of this jar for my other purpose.


One of the things I frequently only need a small amount of flour for is to sprinkle on my board to keep dough from sticking. The lid of this jar twists so that one can sprinkle the contents. Isn't that too neat?

Tuesday, December 9, 2008

Adventures in the Kitchen

So on my grocery shopping spree Monday, I bought a pair of spring chickens to roast. Since Monday was a public holiday here in Singapore, my butcher shop was closed. But the grocery store was open, so I bought them there.
Warning: younger or more delicate blog readers may find this post disturbing.


Let me just say: be glad you don't have to deal with this stuff.


I was only mildly surprised to discover the chickens still had their heads,
but take a look at the indignity this poor fowl is suffering.
Sorry to be so graphic, but I had to share.


Well, I am proud to say that I simply sharpened my chinese cleaver and removed two heads and four feet. And then I made something truly delicious.


First, I made a compound butter: 2 or 3 tablespoons butter, a teaspoon each of chopped fresh herbs (I had rosemary, dill, and some basil harvested from our own plants which I planted for my DH on his birthday in August), 3 slices of turkey bacon, chopped (I would have used regular bacon, but it's so unusual to find the turkey variety in Singapore that I had to buy some), and 2 crushed garlic cloves all stirred together in a small bowl. This butter was then spread under the skin on each chicken breast.
Then I quartered a small red onion and put half in each bird's cavity. I tied the legs together with cotton twine, then placed the bird in a roasting dish. Next I poured a generous amount of olive oil on each chicken, laid some whole sprigs of herbs on the skin, sprinkled some more olive oil and then some dry white wine, and then some freshly ground black pepper.


These were baked at 450 for a half hour, then 325 for 15 more minutes.

I'm not exaggerating when I say they were probably the best roast chicken I have ever made. Totally worth the vivisection I had to commit.

I served them with fresh corn on the cob from Malaysia and roasted root vegetables: potatoes, carrots, parsnips and sweet potatoes with rosemary, quartered onion and sliced garlic all coated with olive oil and salt and pepper.

The dinner was so good, I had to come up with an equally good dessert. So I served perfectly ripe nectarines with vanilla ice cream and crumbled graham crackers, sprinkled with cinnamon.

I feel like such a genius.

The neat part was that we had such a nice breeze blowing through the house that I turned off the air conditioners and they've been off for hours. That NEVER happens. It's usually too humid for me, but it's so pleasant I almost feel like a real human being.

So, what's the occasion? None. Just felt like doing it.

But this post is entitled AdventureSSS (plural)

So, while all this was going on, I made up a batch of cookies I found the recipe for on the internet.

Here's the recipe. See if you can spot the adventure.

3/4 cup butter
1 1/2 cups sugar
2 eggs
Cream together. Add dry ingredients:

1 1/2 teaspoon cinnamon
1 1/2 teaspoon baking powder
3/4 teaspoon salt

Chill for 1 hour. Roll out and cut out shapes. Bake at yadda yadda yadda...Did you catch the error?

I'm standing there, in front of my KitchenAid, thinking this is a little too wet to roll out. Even if I chill it...


Where's the flour?

Well, I eventually ended up adding 4 cups of flour to make the right consistency. But the recipe never mentioned it.

I'll bake these off tomorrow and let you know how they are.

Sunday, December 7, 2008

Ugly Christmas Lights

I was surfing around on the web this morning, trying to find a nice picture of a house decorated with Christmas lights to put on my desktop for the holidays, when I happened on this site. Well, an hour and several LOLs later, I finally had to do something else. Enjoy!